Die Estimate Window
The Die Estimate is generated by submitting your configured data to an online service that calculates the costs involved in your project quickly and accurately. There are seven pages of configurable quote data that can be edited in the browser to provide a final report.
Note: You can provide information about your company such as your address details, engineering capabilities, and machine specifications, to customize the estimate. A set of default parameters are provided under each tab. Edit these values by clicking Settings and opening the relevant tab. For more, see Configuring Persistent Data.
When you have made the required changes, click Return to Last Estimate.
The estimate window contains eight pages:
- Estimate Info
- Plan Die
- Die Specification
- Calculate Die
- Custom Items
- Estimate Die
- Estimate Part
- Report
When you click Calculate Quote, the estimate window displays the first page. Each page displays the settings imported from DieQuote to the Estimate (* Indicates a required field).
Estimate Info
Provide basic Request-for-Quote information that will be added to the generated Report.
|
Section |
Content |
||||||||||||||||||||||||
|
General Information |
|
||||||||||||||||||||||||
|
Part |
|
||||||||||||||||||||||||
|
Operation |
|
Plan Die
|
Section |
Content |
||||||||||||||||||||||||
|
Blank and Carrier |
|
||||||||||||||||||||||||
|
Cutting & Forming |
The length and quantity of all cutting and forming features are imported from the DieQuote model and displayed in this table. All values can be edited. |
||||||||||||||||||||||||
|
Wire EDM |
The Punch Path, Punch Path Plate, Stripper Path, and Die Plate Path lengths are estimated from the cutting lengths specified in the die and are shown here. All fields can be updated with a single value if required. Enter the new value in Punch Path Length then click paste to copy that value to all Wire EDM fields. |
||||||||||||||||||||||||
|
Standard Cams |
The size of the Die Mount, Aerial, Cast, and Filler, and the quantity of these plus the Bump or Box can be edited in this table |
||||||||||||||||||||||||
|
Die Stations |
The total number of Die stations relative to the selected Die method are shown here.
|
||||||||||||||||||||||||
|
Part Dimensions |
The part dimensions can be updated in this table. Click Estimate Dimensions to generate data for the Critical and Non-Critical Dimensions fields. |
Die Specification
|
Section |
Content |
||||||||||||||||||||||||||||||
|
Die Specification |
The information on this page complies with the default Die Specification (Plate Die (high production)). An alternative specification can be uploaded using the Click Here link in the top pane. |
||||||||||||||||||||||||||||||
|
Design |
The following parameters can be removed from the quote by unmarking the checkbox: 3d Design Required, , and |
||||||||||||||||||||||||||||||
|
Punch and Die Options |
The following parameters can be removed from the quote by unmarking the checkbox: Heavy Duty Catalog Retainers, Hardened Backing Plates, Ball Lock Catalog Punches, Scrap Ejector Pins, Cutting Die Inserts, Die Buttons, Forming Inserts, Adjustable Forms, Punch Guiding, and ID Die Details. |
||||||||||||||||||||||||||||||
|
Stripper / Spring Pad Options |
|
||||||||||||||||||||||||||||||
|
Die Set and Build Up Options |
|
||||||||||||||||||||||||||||||
|
Tool Steel Types |
Define the steels that will be used for each of the following positions: Die Set Steel, Cutting Punch Steel, Forming Steel, Draw Die Steel, Draw Punch Steel, Stripper Steel, Form Pad Steel, Draw Binder Steel, Cutting Die Insert Steel, Punch Plate Steel, Die Plate Steel, Backing Plate Steel, Riser Plate Steel, and Pilot Punch Steel. Edit these values by clicking Settings and opening the relevant tab. For more, see Configuring Persistent Data. |
||||||||||||||||||||||||||||||
|
Die and Part Approval |
|
Calculate Die
Review Sizing and Machining values based on selections made in the Plan Die and Die Specification tabs.
|
Section |
Content |
||||||
|
Die Set (Shoe) |
The Calculate All button will populate the following fields based on the values configured in Settings; These values can be edited: Number of Die Sets, Total Die Set Length(L-R), Die Set Width (F-B), Die Set Top Thickness, Die Set Bottom Thickness, Guides Per Die Set, and Setup Blocks per Die Set. |
||||||
|
Die Plates and Punch Lengths |
The following dimensions can be edited:
|
||||||
|
Press |
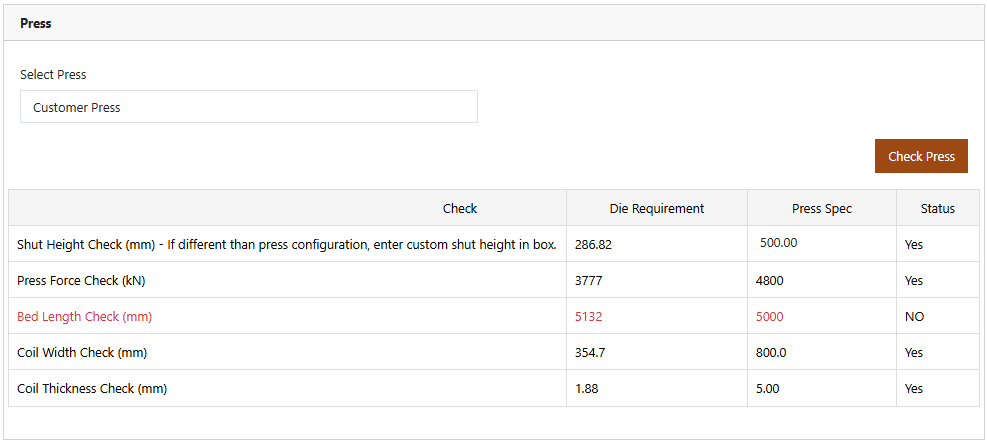
The available press configurations are shown in the Select Press dropdown. Edit these values by clicking Settings and opening the relevant tab. For more, see Configuring Persistent Data.
|
||||||
|
Build Up |
The buildup is the parallels and plates that fit the die to the press. The Number of Parallels, Width of Parallels, Change / Master Top Plate Thickness, Change / Master Bottom Plate Thickness, Change / Master Plate L-R, and Change / Master Plate F-B values are determined by your configuration but can be edited in the tab. |
||||||
|
Die Surface Machining |
Details any complex machining required in the Die (typically milling). A table details the Details, Face Area, and Depth of Cut for each of the Punch and Die Faces, Restrike Faces, Face Recuts, and Posts in the Die assembly. These value are used to estimate the time needed for die service machining. |
||||||
|
Die Stock Control |
The Die Stock Control section shows how many stock items will be required for the die. The values are die-dependent. |
||||||
|
Sensors |
The Sensors section shows how many sensors are suggested for the die. The values are die-dependent. Additional custom sensors can be added in Custom Items. |
Custom Items
Add items that are not part of the standard configuration.
|
Section |
Content |
|
Add Standard Custom Item |
|
|
Add NonStandard Custom Item |
|
|
New Custom Item |
Click this button to add a new Custom item in Settings > Custom. |
|
Remove/Delete button |
Click the |
 button in the Actions column to remove the row.
Estimate Die
Create a Bill of Material style estimate.
|
Section |
Content |
||||||||||||||
|
Upper pane |
|
||||||||||||||
|
Build Estimate |
Click this button to use the upper pane values you have entered to create an Estimate. |
||||||||||||||
|
Estimate Detail |
This table is displayed after the Estimate is built. Blue fields show material costs, Green fields show labor costs. Data shown in white boxes can be edited; If a field value is changed, the lock symbol is enabled which preserves the value if the estimate is rebuilt.
|

Estimate Part
Note: The Estimate Part tab in DE is optional and not always used. Here are two use cases:
-
Tool builders can use it to compare processes (such as prog vs transfer, one up vs multi out die, and so on) and determine the best die type for the application (If the buyer has not specified the type of die they want).
-
Production shops and OEMs can use it when they want a quick production-stamped part cost estimate. This type of user will have internal production cost estimating systems for calculating production cost and not use this DE tab.
|
Section |
Content |
||||||||||||
|
Part Cost Estimate |
Enter the Sheet Material Cost, Lot SizeLot Size, Rate of OperationRate of Operation, Setup Time, Press Cost, and Amortization Parts QuantityAmortization Parts Quantity. |
||||||||||||
|
Calculate Part Cost |
Execute the Part Cost Calculation. |
||||||||||||
|
Part Cost |
This pane displays the results of the Part Cost Calculation. You can make changes to the Part Cost Estimate figures to recalculate these results.
|
Calculation Notes:
- Lot size: Based on the estimated annual part production quantity. Buyers will release quantities to be ordered but inventory stocking quantity and lot quantity are often very different depending on the inventory control strategy of the metal stamper.
- Maintenance cost per event: Based on a percentage of total punch and die cost as this is what wears and has to be regularly maintained.
- Cycles between maintenance: Based on the cutting tool steel type. For example, D2 tool steel should be sharpened approximately every 100-200k cycles (Cycle or Press Stroke Qty between Maintenance Operations).
- Tool amortization: Based on estimated annual usage. Amortization time or quantity is usually dictated by the end-user accounting group and often depends on tax depreciation schedules.
- Run could be associated with the speed of the press, but press speed is variable. Presses may be of mechanical, hydraulic or servo type. The final run speed depends on factors such as stroke, die type, length of feed, and so on.
Report
The final report is displayed on this tab. It can be downloaded as a pdf or saved as an Excel file.
|
Parameter |
Description |
|
Cycles between maintenance |
A cycle is the same as a press stroke. The number of parts is not used because the die may be a muti-off die. The die is regularly maintained based on the number of cycles run, not parts. This value is used to calculate die maintenance cost per part. |
|
Maintenance Cost per event |
A die maintenance event is when the die is sent to the die maintenance area for regular maintenance (not repair). Some shops plan die maintenance at a given interval. This may be sharpening the cutting parts of a tool, replacing springs, or regrinding worn form punches and dies, depending on the die. The cost per event is the estimated material and labor cost expected for each maintenance cycle for the given die. |
|
Run |
This value shows the labor costs per part based on the press and operator(s) costs. There are two types of labor cost associated with production stamping.
|
