Transfer Die Quote Wizard
A transfer die performs multiple operations at the same time, automatically positioning the metal stamping blanks or parts in the correct place.
Both progressive and transfer dies are multi-station dies, however transfer dies use a set of fingers resting on a transfer bar to move the forming part through the X and Y axes, or X, Y, and Z axes, between forming stations.
Transfer dies are typically used to create more complex parts than can be easily produced in a progressive die because they require multiple operations in different orientations.
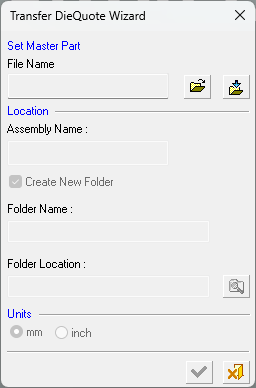
The Transfer DieQuote Wizard dialog
The Transfer DieQuote Wizard accepts a single file as the Master Part for the quotation. When you click the Transfer Die Quote button, the following dialog is displayed.
-
Define the following parameters:
Use the File Name field to select or import the required die assembly file:
-
Open File
 : Open a Cimatron Part or Assembly file (from the Cimatron Explorer) to create a new Die file.
 -
Import File
 : Import an external file (PFM, IGES, SAT, etc.).
The Assembly Name for the die assembly file is automatically created with a 'TQ' (Transfer die Quote) suffix.
-
- In the Folder Name field, accept the default location to save the die assembly file. The folder name is the same as the Assembly name.
Note: The Create New Folder checkbox is marked to add the master part to the project folder, to maintain an organized environment
- In the Units area, select mm or inch as the required units of measurement for the die file.
-
Click the appropriate confirmation button:

OK: Accept the changes, perform the operation, and close the current dialog/task.

Cancel: Cancel all changes and close the dialog/task without saving the settings.
When OK is clicked, the following assembly tree structure is displayed (using the data as shown in the dialog above). Note that the Transfer Die assembly icon is displayed as
 :
: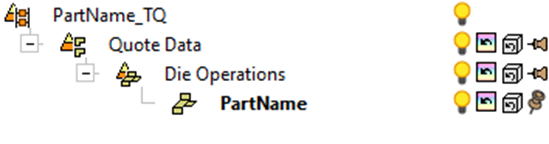
The assembly tree structure will always contain the following two branches:
-
The main sub-assembly is called Quote Data.
-
The sub-assembly containing forming shapes is called Die Operations
-
-
- When you have populated the required data and click OK, the Transfer DieQuote Wizard will place the Transfer Die Guide toolbar on the right edge of the screen which lists the DieDesign functions in sequential order to guide you through the die quote process from start to finish.
